- Get link
- X
- Other Apps
 |
| Final Output |
Introduction:
In this post, we shall start a project to build a C# application integrated with Chromium in Visual Studio. I shall be using Visual Studio Express For Windows Desktop 2013. But the minimum requirements are mentioned below. We shall create a Windows Forms C# project from scratch and integrate Chromium Embedded Framework (CEF) in our application, basic navigation options and much more.
Minimum Requirements and Prerequisites:
- Visual Studio 2012 or Higher that supports NuGet Package Manager.
- A decent internet connection.
- Basic Knowledge of C#.
- Knowlege in using Windows efficiently.
Creating A Visual Studio Project:
First, create a Visual Studio C# Project through File > New Project > Installed > Visual C# > Windows > Windows Forms. Name the file whatever you want, for example 'Web Browser'.
 |
| New Project |
Customising the Form:
Now customize the main form by changing its Properties like Text to 'Web Browser'.
 |
| Customizing Text |
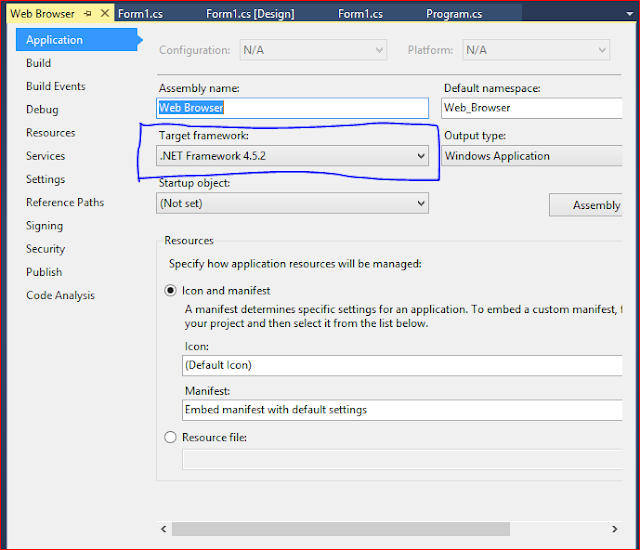
Configuring Project Properties:
The latest version of CEF requires .NET Framework 4.5.2, else you will get errors while debugging. Your project must be set to .NET Framework 4.5.2 or higher. To do so, go to Project > Web Browser Properties and set Target Framework to .NET Framework 4.5.2. If you do not have .NET Framework 4.5.2 on your list, then you have to install .NET Framework Multi-Targeting Pack manually from the Microsoft site.

Note: Also, Any CPU build is capable of newer versions in CEF. But, we shall later set it programmatically. For now, change your Platform Target according to your computer x86 or x64. And, do the same for Debug > Platform.
Adding Chromium Embedded Framework:
Now, from the Toolbar, select Project > Manage NuGet Packages. A new window will open. From the left sidebar, select Online. Now, search for CEF and Install the first package named 'CefSharp.WinForms' (You will need an internet connection for this purpose). After installing, restart your Visual Studio and open your project solution.


Initialize CEF:
You can initialize CEF using many methods, such as initializing in your Form1.cs, or in your Program.cs file. Let us try it out.
Note: CEF can be initialized once in a single process. So, don't initialize it several places, else you will get an error.
Note: CEF can be initialized once in a single process. So, don't initialize it several places, else you will get an error.
Initializing in Form1.cs:
So, the above snippet is the modified code for your Form1.cs. We have added two namespaces CefSharp.Winforms and CefSharp. Then we set ChromiumWebBrowser to be called a browser. After that, we initialized CEF in our main method. Note that other embedded frameworks have dlls to set up their Browser Control to Form Design. But, in CEF it must be initialized in your main method of your Program.cs or in your Form.cs. For, complex projects, to simplify the code, we need to initialize CEF in our Program.cs file.
(OR)
Initializing in Program.cs:
The above snippet is the code for your Program.cs file located in your root project directory. We have initialized it with the same process. But, we have to programmatically display it on our Form1. To do so, perform same as the above add the following lines in your Form1 to display our Web Browser.
First Debug:
If you did all the things correctly, then you will have a successful build and the result will be as the image below. To Debug, Press F5 on your keyboard, or click the green 'Start' Button, or by using Toolbar, Debug > Start Debugging.

You have successfully integrated and initialized Chromium Embedded Framework to your project! Now, your web browser can run web pages that contains HTML5 and CSS3. But, it can not handle JavaScript. To handle JavaScript, we shall create a new class or so. We shall do this in the next i.e. Part 2 of this project where we shall add some advanced features in our Web Browser project. For now, let add some Controls to navigate our Browser.
Adding Navigation Controls:
Without navigation controls i.e. back, forward, refresh, stop and home, a Browser is useless. Let add some controls and containers.
Adding Panel Containers:
Let us add two containers and change the Properties of the two Containers as follows:
For panel1:

For panel2:

After this, your Form1 Design will be somewhat like this:

Note: After adding the panel, the bottom panel should be assigned to display the web browser. So, find the following line in your Form1.cs:
this.Controls.Add(browser);
Change this line to :
this.panel2.Controls.Add(browser);
Let us add some buttons and URL navigator i.e. a textbox. And, change their text and other properties according to your comfortability. For me, I have just changed the Text and Anchor Properties. The design will be as follows:

Adding Code To Navigation Controls:
Now double click the buttons, and it will open code editor with Click method ready. Enter the following code to them:
Now, you ready for your first successful testing for your web browser with navigation buttons. We shall add refresh and stop button later. We shall also invoke User Interface on browser back or forward, but not in this post. That will be in the second post. So, quickly subscribe to our mailing list and get notified when we upload our new content.
Now, you ready for your first successful testing for your web browser with navigation buttons. We shall add refresh and stop button later. We shall also invoke User Interface on browser back or forward, but not in this post. That will be in the second post. So, quickly subscribe to our mailing list and get notified when we upload our new content.
Conclusion and Result:
 |
| Final Output |
So, the above image is the final output of your web browser. Search for some URL and it is done. Still, now we have not set the browser to display URL in the textbox. This will be done in the next part. This part is just introductory and basic. In the next part, we shall add advanced features of a modern web browser.
Update(9/10/2018): The publication of next part has no fixed date. But, I will try my best to publish it within three months of the updated date.
Update(9/10/2018): The publication of next part has no fixed date. But, I will try my best to publish it within three months of the updated date.
ReplyDeleteFullStack Online Training
This is really great informative blog. Keep sharing.
nice blog.thank you for sharing useful information.
ReplyDeleteweb programming tutorial
welookups
Thanks for sharing wonderful information about Chromium. Web Development Company in Bangalore, Ecommerce Website Development Company India
ReplyDeleteThis is really great informative blog. Keep sharing.Web development Training in Hyderabad
ReplyDeleteTop Notch article, it is particularly valuable! I unobtrusively began in this, and I'm transforming into more familiar close by inside the focal point of it better! Delights, articulation war more and hauling continuing extraordinary! Card Recovery Key
ReplyDeleteRecuva Free Download Full Version With Crack Howdy, I see as cognizant part concentrating on this text a delight. it's miles really pleasurable to prepared and fascinating and profoundly tons looking take care of to perusing extra of your trademark..
ReplyDeleteThis assortment includes a good vary of happy birthday desires for girlfriend, as well as ablaze, heartfelt, and romantic birthday desires. In addition, we’ve created pretty HD smart graphics on massive distances birthday greetings for adult Birthday Wishes Long Distance
ReplyDelete